Door Locks
Contents:
Lock Detail View
All aspects of the door lock can be managed or viewed from the Lock Detail view including its current status, settings, access users, access guests, Lock history.
The Lock Detail View shows the lock status at the top of the page, followed by sub-tabs to view Access Users, Access Guests, Settings and History. Each section can be viewed by clicking on the desired tab.

Lock Status

From the Lock Status bar, you can view the current Locked or Unlocked state of the door. To change the state, use the slider and move to the locked or unlocked position.
Please Note: The lock's WiFi radio needs to be awake to receive the lock/unlock command. For example, if the Heartbeat interval is set for 30 minutes, this command may not be received for a maximum of 30 minutes later. However, anytime the keypad is pressed the lock will wake up and receive any pending commands.
The Lock Status bar also displays the last battery level and WiFi signal strength reported by the lock. These levels are reported anytime the lock wakes up and connects to the internet.
Note on Battery Level
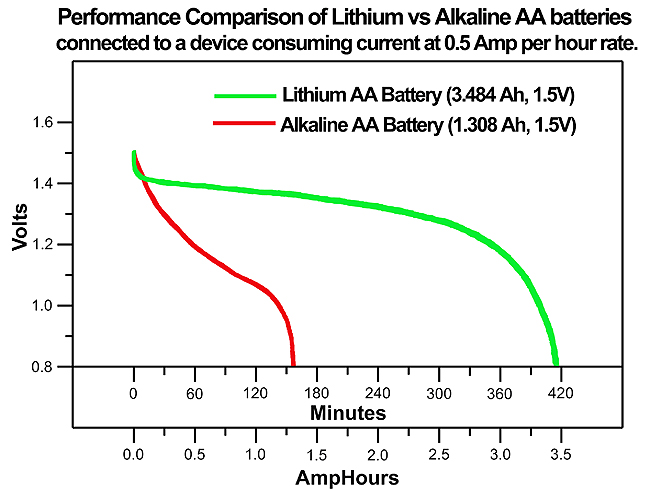
The displayed strength of the battery level assumes alkaline batteries are being used in the lock. Any reading above 6 volts will be displayed as 100% and a reading of 3.5 volts is displayed as 0%. As you can see in the example graph below, the typical discharge curve for Alkaline batteries is very predictable and smooth. Compare that to Lithium batteries that hold a high voltage for a much longer duration but then fall off a cliff when close to end of life. As a result, the displayed battery life within the application cannot be used reliably with lithum batteries.

Lock Settings
The Lock Settings screen allows users to configure the behavior of the lock. Each configuration is detailed below.

Serial Number
This is the unique serial number of the lock and cannot be edited. If the serial number was entered incorrectly when the lock was registered, the lock must be deleted and re-added to make the correction.
Name
You can choose any name for the lock such as "Front Door" or "Unit 201". 100 character limit.
Wake Wi-Fi

This setting determines if the WiFi radio will wake and connect to the cloud service every time a button is pressed on the keypad. For the LS-5i models, it also determines if the WiFi will wake and report the event when the manual thumb-turn is used to lock or unlock the door.
For locks used in high-traffic areas, it may be wise to turn this mode off in order to conserve battery power. Events will then be reported in bulk at the regularly scheduled Heartbeat Interval (setting explained below) instead of after every access event.
Mute

Enabling Mute will silence the beeper on the keypad for stealth mode.
Heartbeat Interval
RemoteLocks communicate through the regular WiFi network, however they’re not always connected to this network. Once a lock is connected to the network, the lock will begin checking in with servers at a regular interval called a “heartbeat”.
Each time the lock connects it will check for new commands, such as locking or unlocking the door or receiving a new schedule or user code. The lock also wakes up and automatically connects to the server the moment the keypad is pressed (if Wake WiFi is set to On). Therefore, if the lock is between heartbeats but someone unlocks the door, it will wake up and report this event immediately.
Also, if you have someone outside the house that you wish to let in immediately, but don’t want to give them a code, simply unlock the door from your smartphone, then instruct that person to press any button on the keypad to wake the lock up. The lock will then receive the command from the internet and unlock the door.
The Heartbeat Interval effects the longevity of the lock's batteries. The longer the interval (the period for which it sleeps), the longer the batteries will last. We recommend setting an interval of one hour or more for the best experience.
Also note that after 5 seconds of inactivity on the lock or no additional commands have been sent from the web, the lock's WiFi radio will go back to sleep.
Auto-Lock

The Auto-Lock setting is also referred to as "Passage Mode" and determines the behavior of the lock after a user code successfully unlocks the door. After the door is unlocked, will the door re-lock (like in a hotel), or will it remain unlocked until the user locks it again.
If Enabled, this will cause the door to re-lock after a user code successfully unlocks the door. If Disabled, it will remain unlocked.
You can also adjust this mode according to a schedule. For example, during business hours you may want the lock to be in passage mode. In this case a schedule could be created to disable auto-lock Monday - Friday 9-5. To create an Auto-Lock schedule, go to Devices/Schedules. This schedule will then be selectable from the lock settings page when the Schedule radial button is selected.
Auto-Lock Timer
When Auto-lock is enabled, this setting determines the length of time the lock remains unlocked before re-locking. Range is 5 to 20 seconds. Default is 5 seconds.
Lock Action Schedule
A schedule can be created to Lock and Unlock the door at specific times of day. For example, you may want the door to unlock on its own at 9AM and lock on its own at 6PM. Or, you can create a schedule to just lock the door every day at 6PM.
Schedules can be created by going to Devices/Schedules and then creating a Lock Action Schedule. This schedule will then be selectable on the lock settings page.
Location
The Location (or Property) where your thermostat is placed.
Access Users
Users that will need ongoing access to a door or a group of doors should be created as an Access User. From the Lock Detail View, click on Access Users to view existing Access Users with access to the lock.
Please Note: Up to 1000 Users (either Access or Guest) can be created on the 5i, 6i & 7i

Add Access User
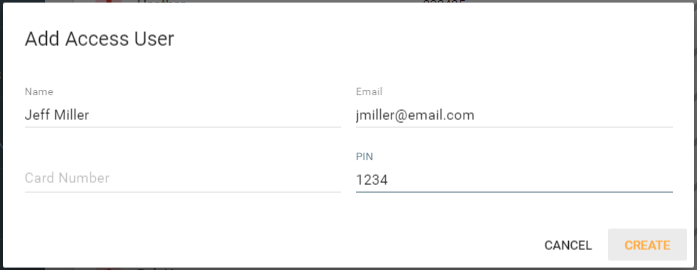
From the Lock Detail View, click on the Access Users sub-tab and then click on Add Access User.

Fill in the Access User's Name, email (optional), Card Number (if applicable - for ACS users only) and PIN number (4 - 10 digits). Once completed, click on the Create button to save the user. The user credentials will now be sent to the lock.
Please Note: Access Users can also be created and edited from the main Access Users category found in the left-navigation. Any access user created from within the door lock management page will also be listed in the main Access User list view.
Access Guests
From the Lock Detail View, click on the Access Guest sub-tab to view, edit or add an Access Guest. Access Guests are intented to be temporary. For example, if you have a rental property and have rented to a guest for the weekend, you can create a limited duration guest code that only provides access within the time and dates specified.
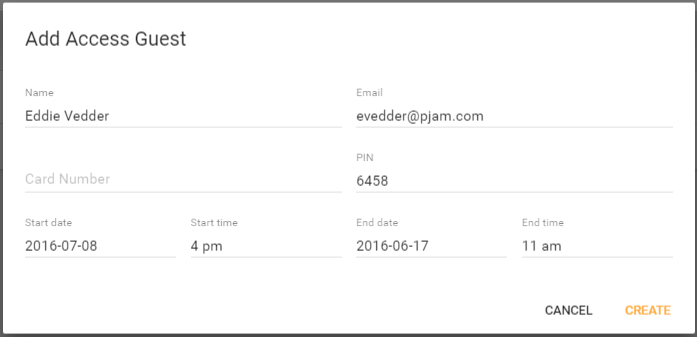
To create a new Access Guest, click on the Add Access Guest button in the upper right.

Fill out the relevant information for the guest including Name, email (if you wish to email the guest their access code), pin code.
Then select the starting date and time and the ending date and time that they have access to the property. This code will not unlock the door before the starting time or after the ending time.
Airbnb Integrations
By connecting your Airbnb account with your LockState account, approved bookings made on Airbnb will be automatically sent to your LockState account. This will then create a code for the guest during the time of their stay and send an email informing the guest of their code and instructions for using the lock.
Connect with Airbnb
To connect your lock to an Airbnb account, click on the "Connect with Airbnb" button located in the Settings tab under Integrations.
If you are currently not logged into Airbnb, on the following screen you will be asked to log in. Proceed to the next step if already logged in.
The next page will ask to allow LockState Connect to access your Airbnb account information which will be used to create codes base on reservation from Airbnb.
A list of properties on the Airbnb account will then be displayed. Select the property or properties that you would like to integrate with this lock.

Common Door
A Common Door is a lock or reader that has automatic shared User/Guest access with another lock or reader.

Add Common Door
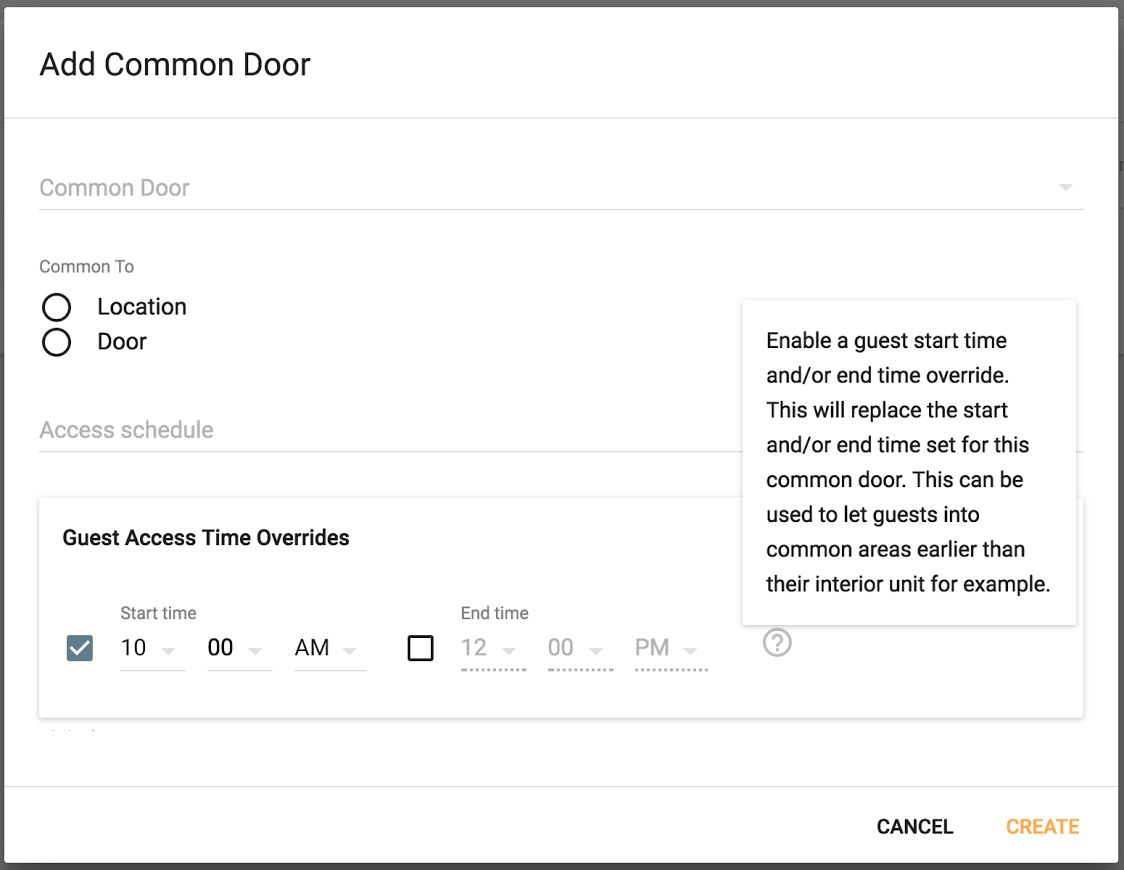
Common Doors are composed of a "common" lock or an ACS Door and a lock or location which the previous lock is "common to". When an Access User or Access Guest code is created for "common to" lock, that code is also automatically granted access on every associated Common Door. Common doors can be chained together by creating multiple entries leading to the same "common to" door.

Access Schedule
Access schedules can be applied automatically to the Common Door for your User/Guest by selecting a schedule.
Guest Access Time Overrides
Guest Access Start and End time options will override the Guest start/end time from the original guest code restrictions. Overrides can be used to let guests into common areas earlier than the "common to" lock/reader.
Please Note: Currently it's not possible to update these fields once created and the door access will need to be deleted and recreated if edits are wanted.**